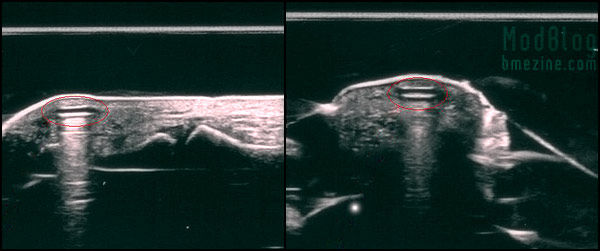
Morbus sent in a couple photos from an ultrasound of a week old magnetic implant that Roland from Visavajara put into his finger. The implant is circled in red, and you can see in the left photo where it’s positioned in relation to the joint.
Morbus sent in a couple photos from an ultrasound of a week old magnetic implant that Roland from Visavajara put into his finger. The implant is circled in red, and you can see in the left photo where it’s positioned in relation to the joint.
Since the last one was so risk-oriented, I thought it was about time to post a series of interviews talking about what it “feels like” to have magnetic implants on a day-to-day basis. Click through for the article, and come back to comment or share your stories.
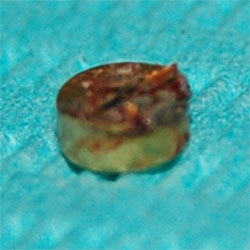
The waste material you see below is all that was left of a magnet that had been in place for quite a while that was removed as part of testing — James Wisniewski, who removed the implant, writes,
“These are the remains of a single magnet implanted in a finger tip. The magnet has broken down, but left the surrounding tissue intact. This magnet was in for over eight months and there were no visible signs indicating any problem with the magnet. The removal was to check on the condition of these experimental magnets along with the interior pocket of tissue which it sat in.”

I’ll say again: the functional effects of the magnetic implants are absolutely wonderful, but their current stability and safety level is far from making them acceptable for general use in my opinion.
Since WIRED (whose story I found via boingboing) are talking about magnetic implants (click that link for my own experience with them), I thought I ought to re-mention them since BME has been covering them for the last few years. The article finishes by mentioning that a 70-shor silicone is being planned for future magnets, which I have to strongly disagree with. A thin silicone sheath, even if it’s a bit harder, is simply not going to protect the magnet in the long term and I do not consider it a viable option unfortunately.
I hope we figure something out so magnets can be implanted for the long term, because they really are a sixth sense (or at least an interface to the sixth), but I don’t believe the solution lies in silicone, and in fact, I think it’s actually in some ways a worse idea because the magnet lasts longer (probably) before it starts to break down, increasing the chances that there will be complications…

This one here is on Shawn O’Hare (who I’ve mentioned here before), who is experienced enough with a scalpel that I’m sure he can remove his own when the time comes.
 Another two months of magnetic implants |
“Man could escape danger only by renouncing adventure, by abandoning that which has given to the human condition its unique character and genius among the rest of living things.”
Most years I publish an “April Fools” article here on BME (articles like Adding and Subtracting, Joshua, The Raelians, and Love at First Bite). This year I’d like to write about dealing with the aftermath of something arguably foolish instead. As you know, last year I had magnets implanted in my fingertips in order to allow me to sense electromagnetic fields. While I’ve been very happy with them on the sensation end of things, as I left off with the last article, it appeared that one of the magnets had started to break down after its silicone coating was damaged by opening a pickle jar wrong (please read that original article first if you have not already).
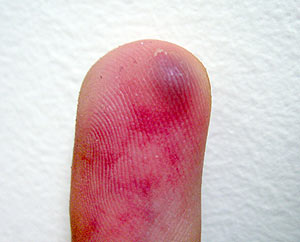
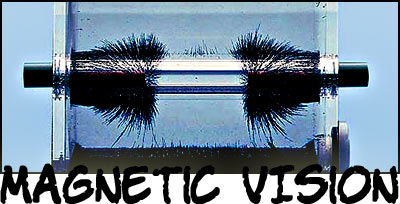
Since that writing, as you can see above, the other side of my hand got similarly irritated (although no trauma that I know of occurred to initiate it as it had on the first problem) and started to blacken and become uncomfortable. I also started seeing photos of magnets taken from other people’s bodies which had significantly broken down — here is, I believe, what is happening:

The magnet starts as a small gold-coated neodymium (rare earth) magnet encased in a thin bubble of silicone. These magnets are tiny (about a third the size of a grain of rice), so the coating is extremely fragile in parts. It doesn’t take much for it to become compromised, and with only a tiny gap (as seen in the middle picture), the body starts to break down the magnet, extracting the substances it can use and trying to encapsulate those that are toxic. Not long after (within weeks if not less), the magnet is almost completely broken down and becomes a loose powder of toxic elements surrounded by bits of silicone. At this point it has of course also lost its magnetism so it is no longer functional either.
Because the effects of neodymium exposure of this type are relatively unknown, and in other circumstances the substance is known to be cytotoxic, mutagenic, and carcinogenic, and because it was somewhat painful, I believe it made sense to have them removed. I asked my friend Tom Brazda to do the extraction — he’s the only person I’d trust to do this (and I suspect there are few piercers who know him and his work that wouldn’t put him on a top five body piercers of all time list).
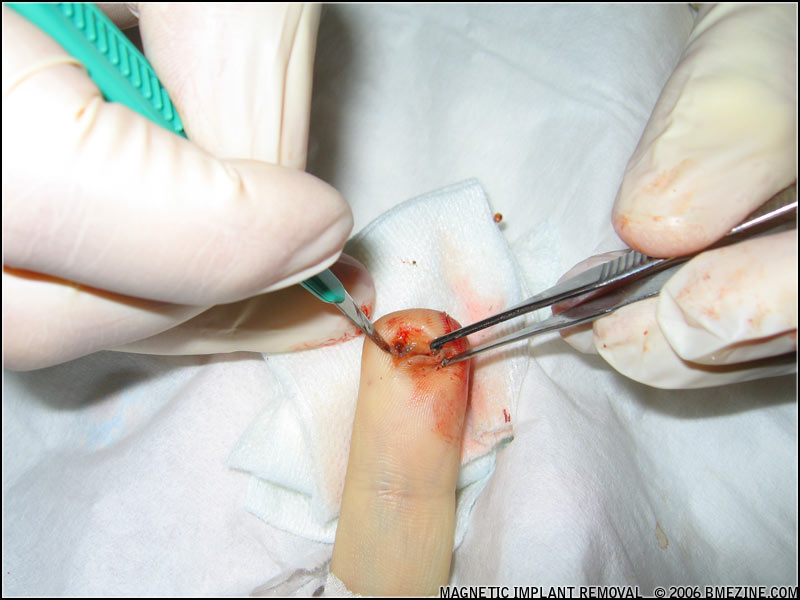
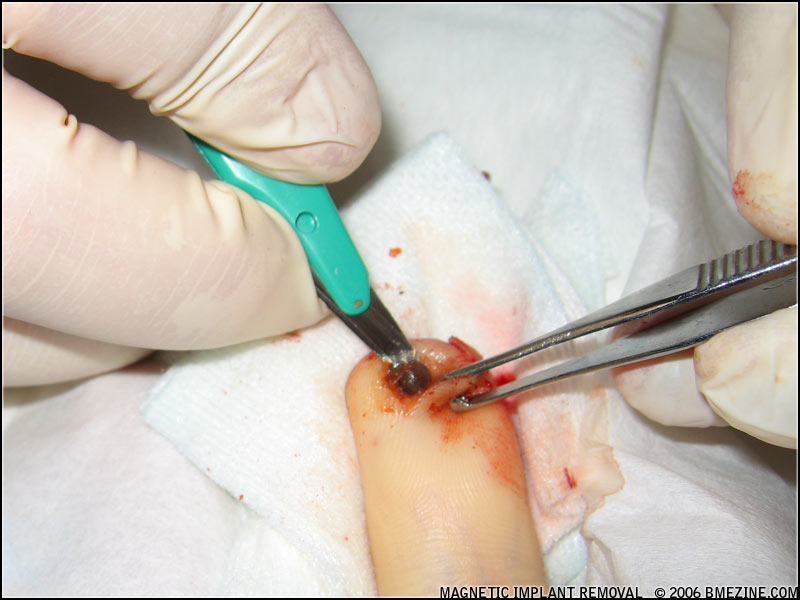
On to the gory details. Be warned that these pictures are graphic.
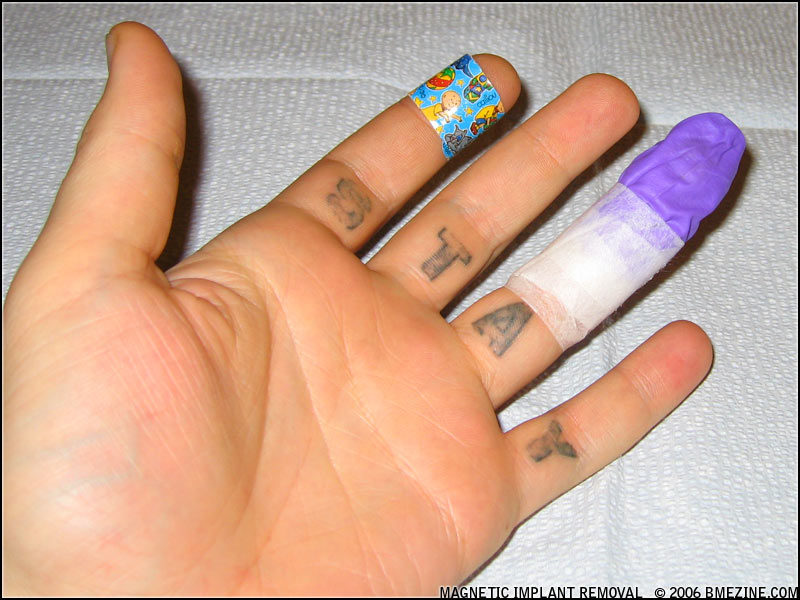
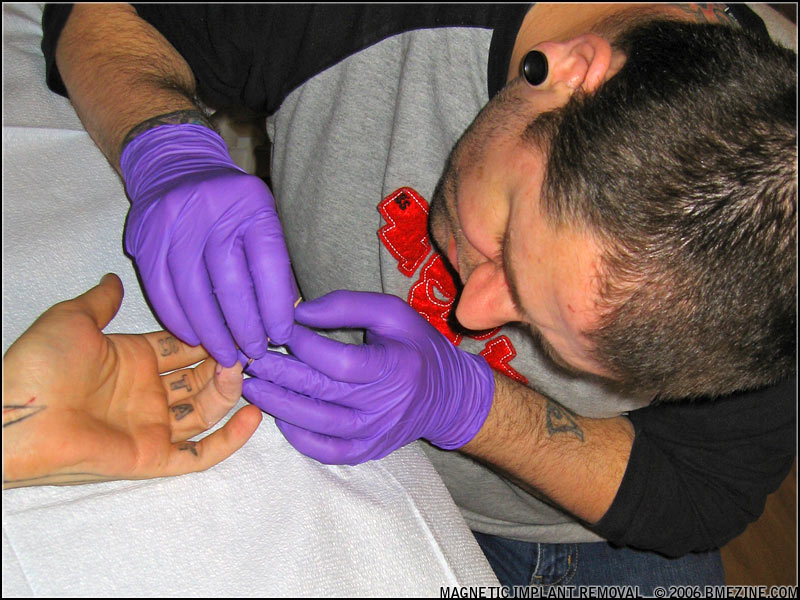
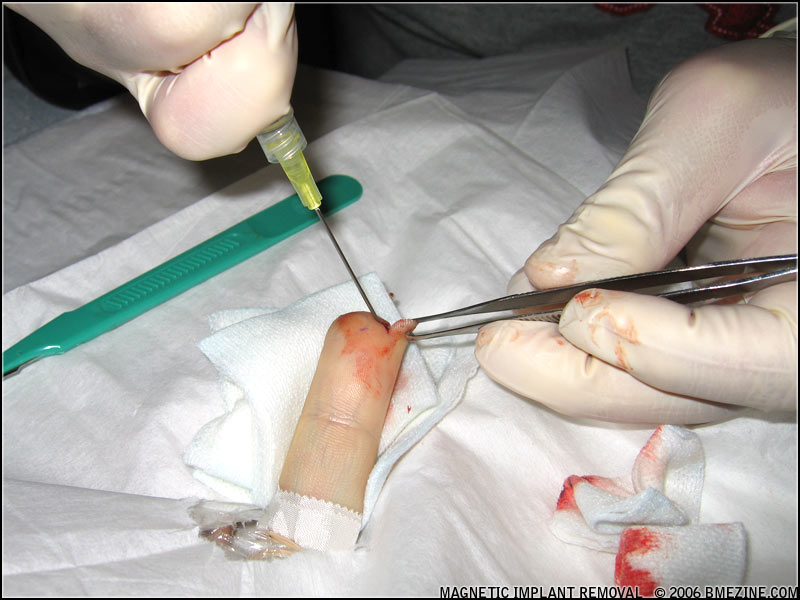
In the first picture we’re applying a topical anesthetic to my finger. The glove-cot contraption is on because the anesthetic needs to be applied without coming in contact with the air. In the second shot Tom is doing a final check of my finger and marking the location of the implants. While four implants had been originally installed, only two appeared to be there eight months later.
My suspicion is that the set slowly migrated together. I believe this shifting has caused them to appear as two, and I also believe that it’s possible that this shifting, which would have caused the two units to vibrate against each other, may have accelerated the breakdown of the silicone.
Oh, and at about this point I got a phone call from a friend urging us to consider aborting the removal… She’d had her doctor (a GP) remove hers, and he cut down toward it, reached in to grab it, and it just fell to pieces… He backed out and referred her to a plastic surgeon. So far she has kept it, and three months later her finger is very discolored (far more than mine was), and still quite sore. She did however mention that she found a clinical reference to neodymium — it is at times used in laboratory mice to extend their lifespans. Hmm… Maybe it’s not so toxic after all?
Naw, better safe than sorry I think!
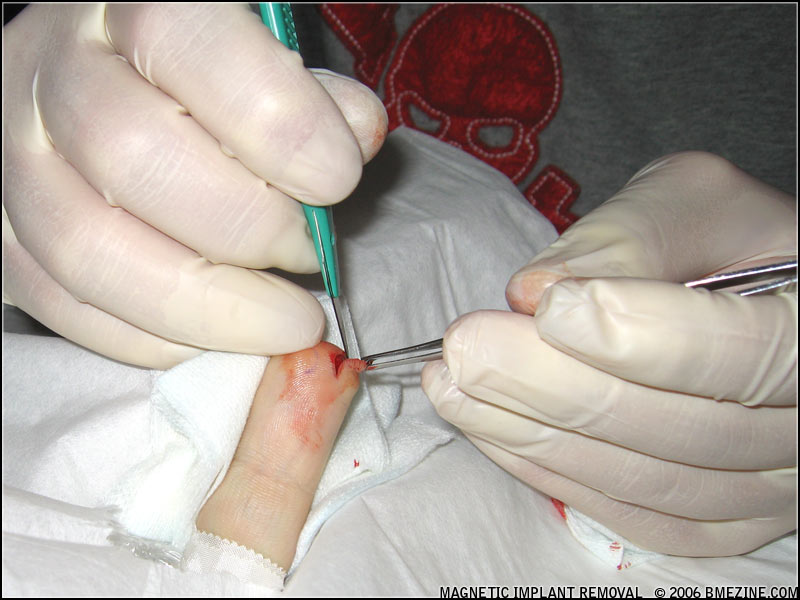
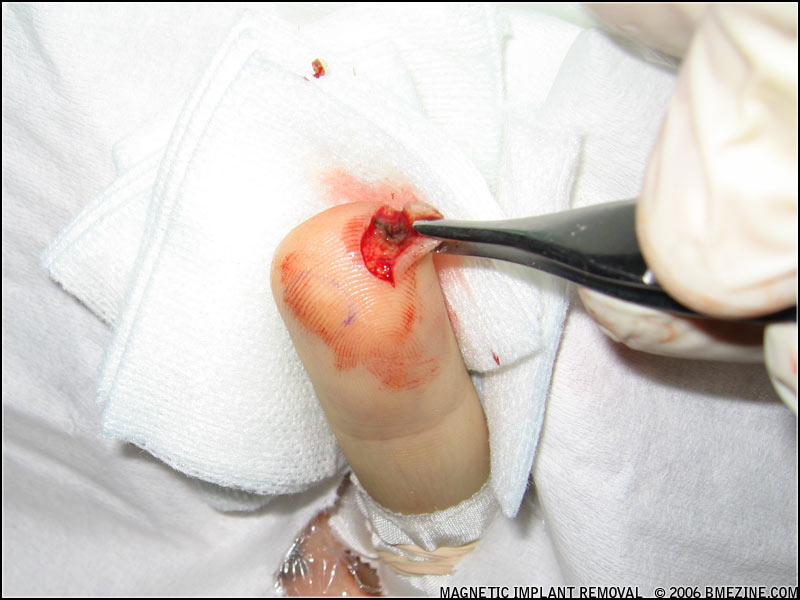
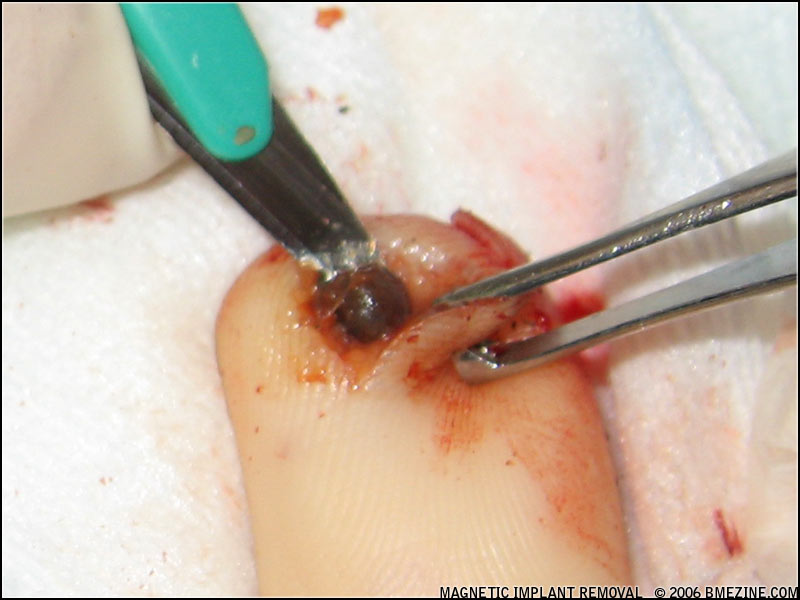
Anyway, we began cutting a flap over the more recent and more irritated of the two magnets. Rather than just cutting down and spreading the skin and trying to pull it out, the plan was to make a cut that would let us just fold open the skin over the implant and remove it either by excision, scraping it off, or irrigating it out depending on the consistency. We couldn’t be sure what the specifics of the procedure would be until we actually got in there.
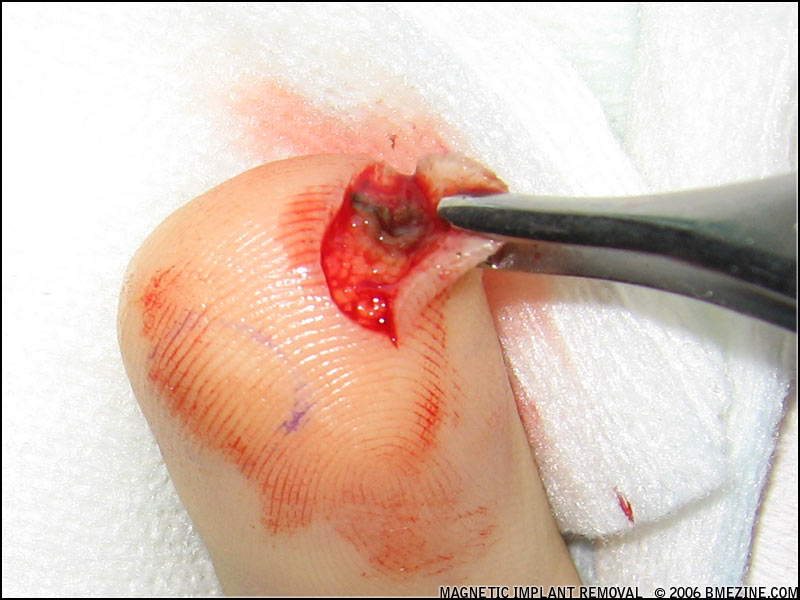
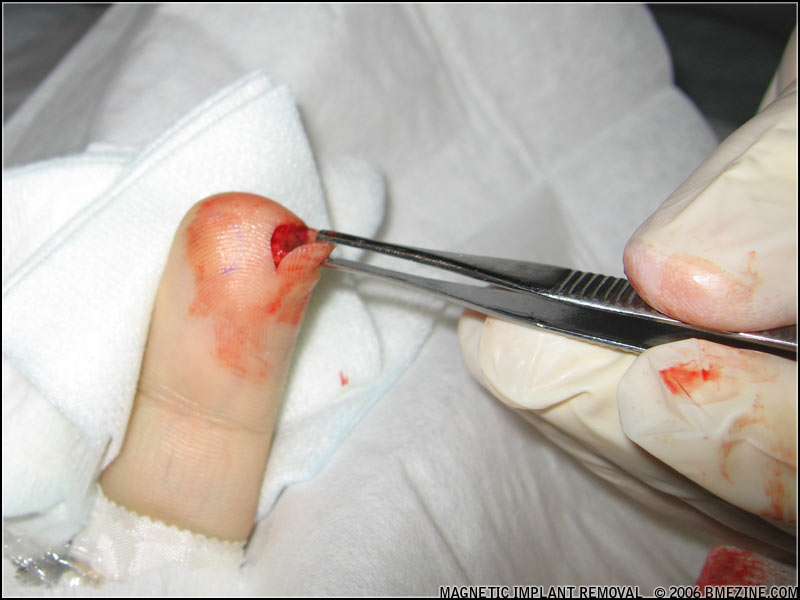
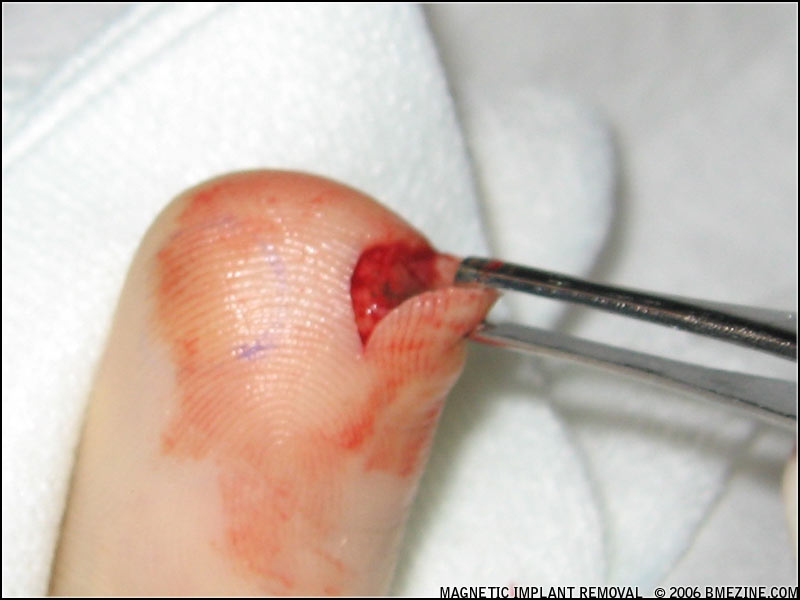
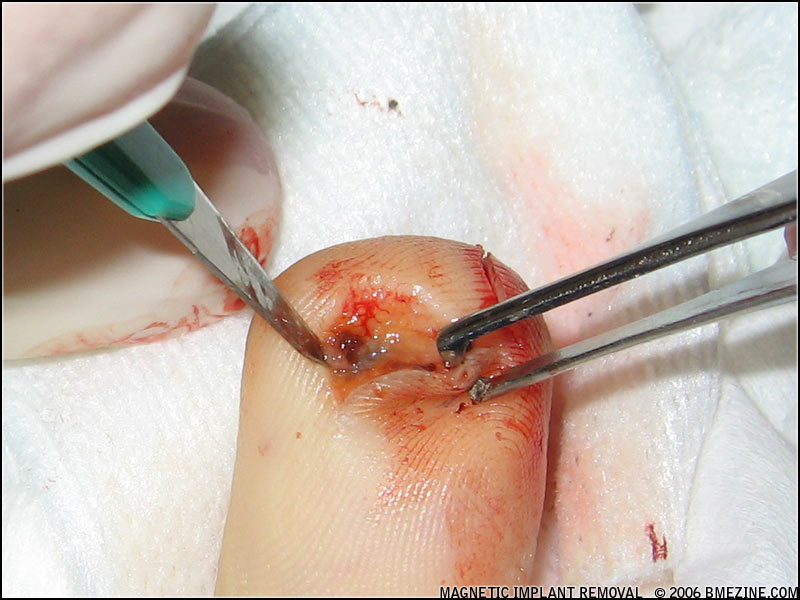
The top half of one or two of the magnets pretty much just fell out (you can see one in the first picture), but we were left with a largely empty cyst-like shell made up of and surrounded by blackened tissue. There were some loose flakes and powder but most seemed to be a part of the spongy mass of scar tissue. Irrigating it didn’t move anything, and it was completely adhered to the flesh around it, so there was no way to grab it and pull it out. All we could do is cut all around it and remove it as a single piece.


Some healthy tissue was removed, but the majority (if not all) of the toxic material from that side appears to be gone.
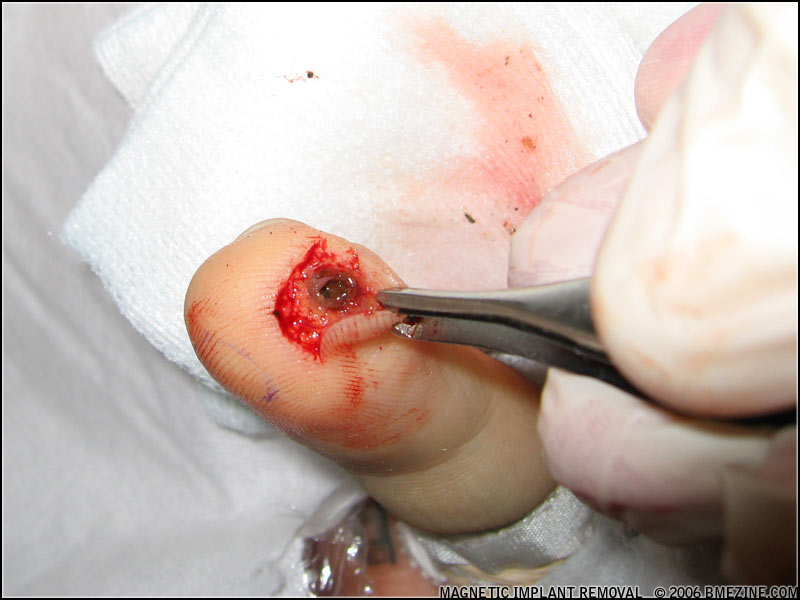
Going into the second side (the older of the two compromised sides) we encountered a little different tissue. The implant also sat quite a bit deeper in the flesh; deep enough that we couldn’t be completely sure at the time there wasn’t another hidden behind it (and while I think it’s gone, I won’t be entirely certain what’s left until the healing is done).
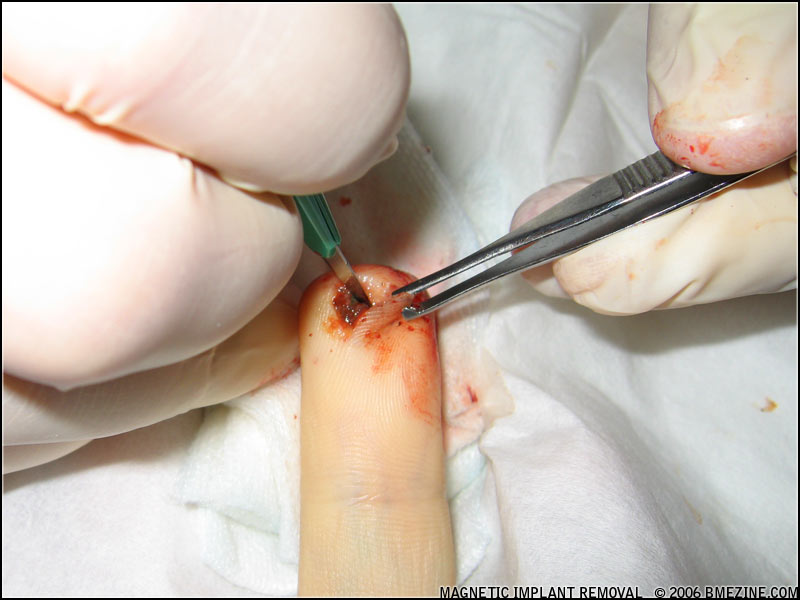
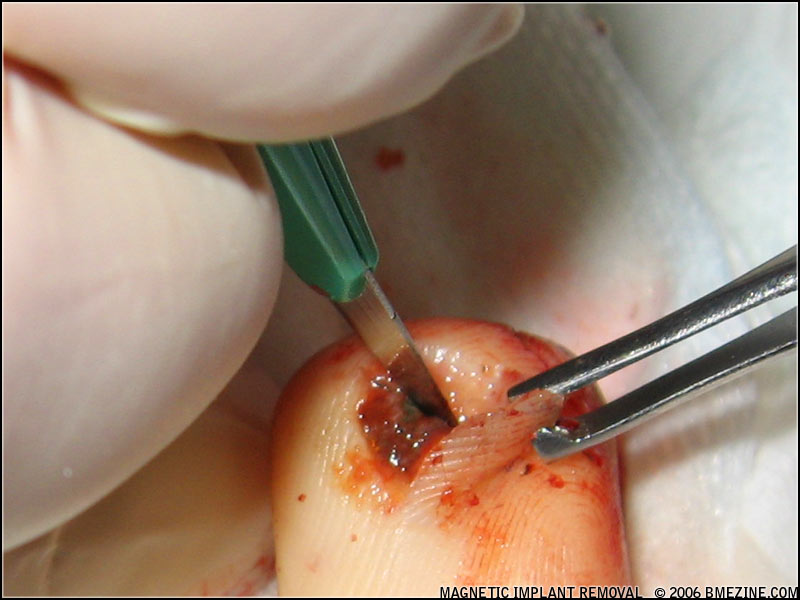
When we’d dug down deep enough to expose it, the good news was that the cyst was quite well developed. It was rooted in place a little, but we were able to pull it out without significant damage to the surrounding fingertip and with minimal excision of healthy flesh. It was seriously gross though seeing these really vile and rotten looking blobs coming out of my finger!
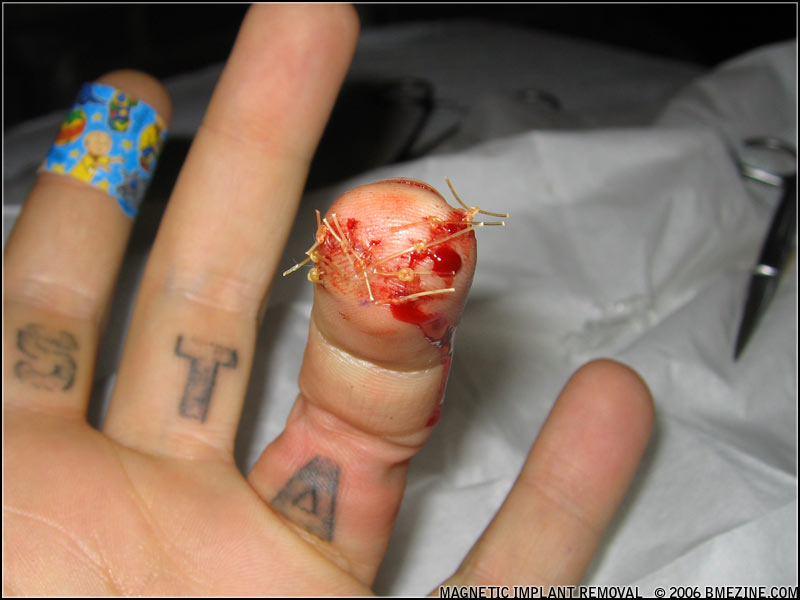
Now, with my fingertip completely exposed, but finally clean, it was time to stitch me back together, and we were done. I’ve been very stressed out over these problems, and it felt so good to see those sutures going in and knowing this was almost over.
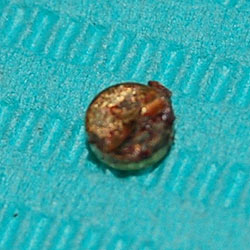
My only regret is that we accidentally threw away the removed tissue and magnet bits as we were disinfecting the workspace. I’d hoped to take a much closer look at the magnet, but unfortunately that “oops” moment killed that. I can however share with you a magnet that rejected from the finger of a friend of Steve Truitt after about four months. This one has barely broken down, but the silicone is gone from one side, part of the gold coating has eroded, and the inner core has started to decompose.
Some people’s bodies will reject the magnets like a splinter (the lucky people), other bodies will try and encapsulate them, others will try and break them down, or a combination of all of these strategies. Internal body chemistry will also greatly affect how quickly the process happens.
I’m treating the wound with Neem pills and a Neem spray and so far it appears to be healing quite well. My right hand, which also contains magnets (but in a stacked configuration and with a thicker coating of silicone), so far has experienced no problems. In fact, it’s gotten more sensitive over time and I find myself becoming more and more aware of the electromagnetic environment around me (for example, noticing “hot spots” in power cables and couplings that are leaking radiation into the air)… But, I think it’s only a matter of time before that stack is compromised as well, and as sad as it will be to remove them, I think I have to take them out as well.
Talking to Steve Haworth and others, it sounds like a significant percentage of the small magnets implanted in people are already breaking down. It’s effectively a defective product, not even safe enough for a year in the body, let alone a lifetime. Steve tells me he’s considering ceasing sales of his smallest units (they are currently for sale on eBay), but honestly, especially given that we’ve known now for months that they’re not very stable, I feel that it needs to go a step farther and a recall needs to be issued for all of the silicone coated magnets that are out there. I do not believe that any of them will remain stable in the long term, and I believe that all of them will break down in time as I’ve described here.
One of the problems with body modification these days is, well, BME and the internet in general… When someone comes up with a great new idea like these magnetic implants (and it is a great idea), it’s instantly posted, and everyone wants it right now. But now, because of that rush, there are dozens of people, many not inside the body modification industry (so they’re without easy access to removal, let alone monitoring), that need surgery that could have been averted with a proper testing cycle.
I’d like to propose that for volatile implants and other procedures that can have unforeseen effects on the body, that these procedures should be limited to people working inside a studio or otherwise able to go to the studio the practitioner works in on a nearly daily basis. These things need to be aggressively monitored and documented so the risks are thoroughly known before they move into the client sphere. It’s one thing when we endanger ourselves as professionals inside this industry, but it’s another thing if clients who may not understand that the risks are not fully known are put into that same danger.
When I receive photos to BME, for every thousand fresh photos I receive perhaps one hundred healed photos… Of the two, it’s the healed photo that has more value. Think surface piercings — you can do a crazy corset with rings and it looks great fresh, or a forearm piercing with a straight bar and it looks great fresh too, but good luck getting a healed photo. Furthermore, for every healed photo I get, I get one problem photo (that is, a photo of a serious complication). I think because when people get a body modification others tell them it’s a stupid thing to do and too dangerous, so when things go wrong, there’s often a sense of shame and embarrassment… So they hide that the problem happened, and other people repeat their mistakes because they were unaware of the risk.
Let me be very clear about this: things go wrong all the time. It’s part of the game. But when things do go wrong, rather than hiding it, we need to share everything we know about the problems so they are less likely to happen to someone else.
In this magnetic implant procedure, one main simple thing went wrong: the magnet is not stable in the body, and the coating provided was not a sufficient permanent barrier between the magnet and the body. For existing people, I again strongly urge removal — and don’t kid yourself into thinking that because yours hasn’t broken down yet that you should be able to keep it. If yours hasn’t broken yet, thank your lucky stars that removal is going to be much simpler!
For people who’ve not gotten magnets implanted, I really have to emphasize that implanting this style of magnet with a thin silicone sheath, knowing what we now know, is reckless to the point of being stupid, since it simply doesn’t work. The initial product has turned out to be defective — but I believe we can still make this work. Glass (like an RFID) won’t work because the magnet can’t be exposed to heat without de-magnetizing it. There are however other polymers such as polyurethane (used to coat artificial hearts) with better durability and good biocompatibility that can be applied and cured at room temperature. So don’t think the idea of giving humans magnetic vision is a dead one!
[Please be sure to visit the companion article to this by Jesse Jarrell; it’s a great explanation as to the thinking that went into the development, and also includes some of Jesse’s ideas as to why things have gone wrong and how they could be fixed.]
But let’s be sure that we take it slow, wait out a few people testing them before we go putting hundreds of experimental devices into people who can’t easily find removal options, and document our failures as well as our brilliant theories! There’s nothing wrong with taking risks, but taking needless ones is, well, foolish.

Shannon “Nine Finger” Larratt
BME.com
A Six Month Retrospective |
Life is “trying things to see if they work.”– Ray Bradbury
In early 2004 BME documented the concept of magnetic implants for the primary purpose of sensory augmentation. You can read that article for an introduction and information on the originators, but the basic concept is that if you implant small magnets under the skin, they will move in response to an electromagnetic field and transfer this as sensation to the surrounding nerves. This in effect allows one to extend “vision” (or touch) into the electromagnetic spectrum, giving you a sixth sense that normal humans do not have — the first real “superhero” modification?Roughly speaking, magnetic implants break down into the following types:

In relation to the last type, sometimes people ask about whether magnetic implants could be used to hold a watch or eyeglasses or other appliance in place. The short answer is that this is not safe or viable. Even very slight compression (as you’d have between the internal magnet and the external device) can quite quickly cause the tissue to be choked off, die, and induce rejection. As a point of trivia, this is why it can be so dangerous for a child to swallow magnets — if two magnets clamp across the intestinal wall, they crush it and it leads to the development of a very dangerous hole.
That said, the magnets involved are also very small, so attaching devices wouldn’t be easy because they’re just not powerful enough. The good thing about this though is that the magnets have zero effect on credit cards, hard drives, monitors, and so on.
Personally I sought out magnetic implants for sensation — to experience more of the world around me and have a deeper understanding of physical existence — which brings me to Steve Haworth and Jessse Jarrell.

Getting them done
The first generation of magnetic implants have been manufactured by Jesse Jarrell (IAM:Mr. Bones, who you also know from projects like Kaos Softwear) and have been primarily installed by Steve Haworth (IAM:steve haworth), easily the most experienced implant artist in the world and one of the only ones that I trust to work on me. After making plans at the 2005 APP meeting in Las Vegas to do the procedure, it was just a matter of being able to synchronize our busy schedules. This ended up happening a month or two later as I was on a road trip from Chicago with my wife Rachel (IAM:MiL0) to our home at the bottom of the Baja Peninsula in Mexico.
After discussing various placement options and configurations, we decided to try two different possibilities so I could help assess which worked best — a “grid” of four single magnets, and a set of five or six magnets stacked up and encased as a single unit. The magnets themselves are rare earth neodymium magnets (so they are quite strong for their size) and are encased in silicone to make them safe to implant (safer anyway). One of the magnets I’d had for some time, and the others were made to order that day by Jesse. The process of autoclaving can weaken the magnets, so they were disinfected using a chemical soak.
While one could in theory implant the magnets using a needle follow-through method similar to a beading, we put them in place by first making a small incision in the tip of the finger and opening a pocket using one of Steve’s smaller dermal elevators. It took a remarkable amount of force to create the pockets. After each pocket was ready to accept the magnetic pellet, Steve (assisted by his partner Cookie; IAM:Miss Cookie) used the back of a taper to push them into the hole — this was quite difficult to do as the magnets themselves are about a third the size of a grain of rice, very smooth and slippery, and of course the hole had blood in it. But, after a little fumbling with them, they each were in place. Small sutures held the wounds closed and I was bandaged up. The five separate incisions and placements were all completed within half an hour, and while having the ends of your fingers messed with is certainly highly unpleasant, it was far easier than I’d anticipated.


Inserting several of the small magnets — you can see how tiny they are!


Closing the wounds with single sutures.
ABOVE PHOTOS BY RACHEL LARRATT
They were quite tender for the first week until I cut the sutures out, at which point the pain went away almost immediately. If I touch the area they can be felt and are a little tender if pressure is applied, but not so much that they affect typing or most things I use my hands for. The incision points have left several tiny, almost invisible scars — nothing you’d notice unless you know what to look for. The implants themselves are not visible and do not distort the skin because they’re so tiny. As of this writing I have had the implants for six months.
Effects and Sensation
Jesse had told me that it could be a month before I’d be able to feel anything from the implants due to the surrounding tissue taking time to normalize, so I was surprised when I felt a strange sensation in my fingertips as I used my computer about a week after the procedure. My laptop at the time had dual harddrives and due to using a desktop CPU, an inordinate quantity of fans. Running my fingers through the air over the surface of the computer I could feel a faint vibration coming from each of these microengines, and this vibration changed slightly as the actions of the engines changed the electromagnetic field they were generating. It’s hard to exactly describe what it feels like — it’s definitely not as simple as “I can feel the implant vibrating under my skin”, which is true, but I am completely unaware of the presence of the magnets… It’s more like being able to “touch” the EM field. It’s very tangible, and the best way I can describe it is a combination of vibrating air and a strong sense of static electricity.
Later on I started being able to sense other fields as well. Sometimes I can feel store security gates as I pass through them, although usually I can’t feel them at all unless my hand happens to pass very close. Only once (at an art gallery in Paris) did I experience a very obvious gate — it was turned up so high that it was almost painful at a distance of two or three feet, feeling very much like dipping my fingers into an ultrasonic cleaner; an extremely fast and aggressive vibration! My theory is that the system was malfunctioning, but of course no one else could possibly have been aware of that. Another device that generates a very strong field that I can feel from a distance is my microwave. What’s particularly interesting about that is if I put it on a variable program (ie. defrost and reheat a plate), I can feel the EM field’s vibration strength and frequency change as it passes through different stages in the cooking. I’m not sure if I should worry now that my Mexican-bought microwave is not properly shielded? Finally, I can also feel the vibration of power transformers and sometimes even emissions from power cables themselves. Our environment is sensually rich in ways most people are completely unaware of!
So far with the limited number of people who’ve gotten these implants it seems like different people are more sensitive to different types of fields — personally I am most sensitive to motors. I don’t know if that’s due to subtleties of the placement and orientation of the implant, or if it’s something related to the person themselves. As I mentioned above, I have different magnetic configurations in each hand; four individual magnets in a grid in my left hand and a long single stack of magnets in my right hand. Surprisingly, my experience has been that there is absolutely no difference between the two. To me they feel completely alike. This also makes me believe that the differences that various people have experienced in what they can sense is due to their own innate nervous structure rather than the placement itself.
Problems
The biocompatibility of neodymium has not been investigated (so carcinogenic and mutagenic toxicity and so on are complete unknowns) but it is considered a generally toxic irritant and moderately poisonous with documented adverse effects. Really, no reasonable person should be asking for exposure to it by implanting it under their skin! Let me emphasize that this is a fundamentally risky act with unknown consequences.
In order to keep the neodymium from coming in contact with the skin, the magnets have to be coated with something inert. In my case and in the case of all the others that I know of, this is achieved by coating them in a sheath of biocompatible silicone (the same type of medical silicone that is used for everything from chin implants by plastic surgeons to 3D-art by non-medical practitioners). Unfortunately so far this solution has not been entirely ideal.
In my own case, I found myself with a hankering for pickles one afternoon and needed to open a jar of them on which the lid had become stuck. I grasped the jar with my right hand and the lid tightly with my left and turned. As I did so I felt a pain around one of the small magnets in my left hand as shearing forces tore across the magnet and its sheath… I realized immediately that I’d just “peeled” the silicone off of the magnet. There was a slight inflammation and soreness over the next week but it settled down fairly quickly. However, as time has gone by the surrounding tissue has blackened, confirming my theory that the neodymium was exposed to flesh. I haven’t decided yet what to do about this problem. A reasonable person would probably choose to remove at least the compromised implant, but I’m not a reasonable person. So for now it has become another experiment. I worry as well that my stacked magnet is going to break in half if I hit it wrong.

In addition to damage to the silicone sheath from shearing forces and impact damage, the current method of production — hand dipping in liquid silicone — is problematic because it can very easily result in thin patches that are sensitive to the point where they become compromised during the process of insertion. If a mold is eventually made for casting the silicone sheath this problem should be all but eliminated.
Unfortunately I am not the only person to have experienced complications. My friend Monte Vogel (who you know from BME’s QOD and as IAM:MONTE) had to remove an implant from a client’s lip. I should note that while he removed it, the implant was put in place by an inexperienced practitioner in Minnesota using a traditional beading style procedure (ie. piercing with a 12ga needle and following this with the magnet). Somehow during the procedure it seems the silicone sheath (already extremely thin in spots due to hand dipping) was compromised, exposing the neodymium to flesh, and this was compounded by problems with migration.
BME: What necessitated removing the implant?
MONTE: It had moved into the upper tissue layers and looked like a growth or cyst just under the tissue, and became both a visual and physical nuisance.
BME: What was the removal procedure like?
MONTE: I used a #11 scalpel to gradually cut my way into the area, blotting it with gauze as I worked. Extra precaution was taken going in so that I wouldn’t damage the implant since we didn’t know at the time that it had been compromised. When I got to the area all I saw were little black flecks. I gently tweezed out the ones that I couldn’t pick away with the scalpel blade tip. Below these pieces was the majority of the implant.
I never saw the implant before it was placed, so I don’t know what it looked like originally. What I removed was the small magnetic piece with half of the silicone casing still attached to the back side with no other silicone pieces to be found. The silicone was translucent making it impossible to see. Imagine dropping a contact the size of half a pin head — the original intact pellet implant was small enough to be placed with a 12ga needle.
BME: What was the condition of the surrounding tissue?
MONTE: The surrounding tissues that had been in contact with the exposed side of the implant had stained a darker color. This made it even harder to find and remove all the little flecked pieces but I spent extra time to make sure that I removed everything I could see and find.
BME: Given what you’ve seen, what’s your assessment as to the viability of this procedure and type of implant?
MONTE: The implant’s thin silicone coating is very fragile, and with all of these potential points of compromise it is hard to say how safe any procedure of this type would be. This is definitely not something you would want to have an inexperienced practitioner do. Know the risks and reduce them as much as possible.
My own assessment as to the viability of these implants is that figuring out a strong and durable sheath is essential. I would strongly recommend that perhaps even an alternate polymer, or at least a much harder silicone, is required to safely implant neodymium or another potentially toxic substance into the body.
Conclusions
First of all, let me say that I’ve been very happy with my magnetic implants so far, and that I understood the risks (and accepted the unknowns) coming into this. The experience of developing another sense (or at least a pseudo-sense that extends my ability to “touch” in new directions) has been very exciting and illuminating, and I wouldn’t want to give that up. For me the effects have been more of a curiosity and growing experience than something objectively “useful”, but Jesse Jarrell who has a more electrically-oriented life tells me that he’s been finding them genuinely functional:
“I find I use mine more and more as a true tool or utility, especially since I have moved into a new warehouse and have been doing a lot with wiring and construction, where the sense actually comes in handy surprisingly often. I think professional electricians would get a lot from these.”
That said, it is not a procedure that I can recommend in good conscience until the containment problems (the delicacy and potentially short lifespan of the polymer sheath) are solved. I believe that knowing what we know now that implanting the current style of magnetic implant is irresponsible and reckless. However, once this problem is solved, I recommend these implants whole-heartedly. In terms of the configuration that I recommend, I believe that groups of single, small magnets are far safer than and just as effective as the stacked groups.
Jesse concurs and gives us a hint as to his future developments,
“My thoughts for improvement have gone towards more and smaller magnets. We may be getting our own parylene coater soon [ed: parylene is a biocompatible dielectric coating that is commonly used to shield non-compatible medical implants from surrounding tissue], so that would allow for a much thinner but still robust coating.”
“I like the idea of a dispersed magnetic dust — lots of tiny units spread across an area. It wouldn’t be the easiest to install or remove, but I think it would yield the best sensory results. I also think longer thin strips of tiny magnets might be a nice compromise for installation and removal ease.”
I definitely like the idea of an implantable magnetic dust that could sensitize large areas of skin and look forward to seeing where functional body modification goes in general. For me, I probably have to steel myself for some serious discomfort and take scalpel to fingertip and remove the problematic implants. I wonder how blind I will feel having been given this extra vision and then losing it again?
If you’re interested in having magnetic implants done yourself, or are a practitioner looking to buy them, my advice would be that you contact Steve or Jesse directly. Links to their IAM pages are above, and you can also visit stevehaworth.com and jessejarrell.com directly for alternate methods. Good luck everyone, and if you try something, please be sure to let BME readers know how it went for you!
Shannon Larratt
BMEzine.com
This isn’t really an implant of course — it’s a cross that’s been semi-permanently mounted on the wearer’s chest using three microdermals to hold it in place. Christopher Lee Shelafoe of Marquette, MI’s Rendezvous Tattoo & Body Piercing (I recently featured an anarchy scar he did) is who installed it, said that in an ideal world he would have like to use a lighter cross, but the client specifically needed that exact cross because it had belonged to his child. So they did it as best they could, with the understanding it was an experiment. It was still in place last time he spoke with the wearer, who has since moved away. Christopher and I were talking about how he’d tackle this next time, and he’s working on having microdermals mad with magnetic ends so that the cross (or whatever) can be solidly mounted, but will pop off without injury if it gets snagged.

 I wanted to share with you a remarkable conversation I had with a friend of mine who works as a nurse in a hospital. She also has a magnetic implant in her fingertip, and the ability to sense electromagnetic fields that comes with it. This may be the best example I’ve heard to date of the real-world value of magnetic vision, illustrating that it’s not “just a neat trick”.
Jennifer: Hey Shannon, I have a question for you about the magnet in my finger. It has been there for months. I am pretty used to the odd sensations that come with it. As you know, I’m a nurse and everyday since I got my magnet I have turned on nebulizer machines for my patients. I usually get a small “vibration” (for lack of a better word) around all electrical appliances. But, yesterday, I turned on one (that I have turned on multiple times since getting my magnet) that made the magnet “vibrate” so hard I thought it was going to fly right out of my finger in pieces. You could actually see my finger moving. It startled me a little. Naturally, I jerked my hand back. The machine was working fine, like always, and my finger was fine. The magnet still worked and felt as if it was in one piece still. So, I put my hand back towards the machine. It did it again. This is the only time it has ever done that. So, now I am curious to know, is there a possibility I am sensing a “short” in the wiring or some malfunction with the machine that has yet to become obvious to anyone without a magnet in their finger? None of the other machines (which are all identical) do it, and that particular machine has never done it in the past. I know nothing about electronics and mechanics, but this seems odd to me. I would feel horrible if I left this machine in my patients room for them to use if something were wrong with it, but since the only thing I could tell my boss is “It makes my finger feel funny” I left it there until I could try to find out if there is a possible problem or if I am just overreacting. Any information would be really appreciated.
Shannon: Yes, it’s completely possible that you’re sensing a short. Or perhaps a problem with the transformer… SOMETHING is causing a more powerful EM “bubble” to form. If you’re sure that one machine is significantly different from others that should be identical, then I think it’s safe to say that something is definitely wrong with it… Try moving your finger around the device to try and feel where the EM field is coming from — it will likely either be the engine or the transformer. Personally I would explain the issue to whoever is responsible or in charge.
Jennifer: I work tonight and will remove the machine the moment I get there. I will have to let you know what maintenance says about it. I will probably show them your message if that is ok. I could never explain it that well. I just had a gnawing in my stomach that something was wrong with it since it had never done that before. Thanks for the help and advice. I will keep you updated.
Shannon: Cool — keep me in the loop. It’s quite fascinating. I’m dying to hear what maintenance finds out.
The evening passed, and here’s the message I got in the morning.
Jennifer: Good morning Shannon. I just got off work and wanted to update you. When I got to work last night I went right for the nebulizer to get it out of her room. It had already been changed out. Evidently it had a nasty fall a few days ago and just stopped working yesterday afternoon. So they gave her a new one. The bad one is still under warranty so it is being sent back to the company that makes them. I have emailed our maintenance supervisor to see if there is a way we can track it with the serial number. I will let you know if I find out any more about it.
Isn’t that amazing? I hope this helps to illustrate what a wonderful and amazing thing magnetic implants are, and how the insights that this “sixth sense” gives a person are very real, and off valuable and legitimite insights into the modern world. I’ll wrap up by mentioning that the picture in this entry is of one of Jennifer’s many scarifications (since the magnet is pretty much invisible and doesn’t make much of an illustration!), this one by Stu Modifies.
This article is a based on the seminar notes from Samppa Von Cyborg on his transdermal implants, as prepared by Alix Fox. In this abridged form it was edited by Shannon Larratt for public presentation. While parts of this article do discuss procedural techniques, it should be emphasized that this is in no way a “how to” or training of any sort. It is being shared here to help those with an interest and passion for body modification understand the development history of transdermal implants as well as some of the medical and “wearer” issues involved.
* * *
THE TRANSDERMAL IMPLANTS OF SAMPPA VON CYBORG
Influential body modification artist Steve Haworth is credited with inventing the transdermal implant, with the first instance being installed in 1996 as Joe Aylward’s famous “Metal Mohawk”. Four years later, Samppa Von Cyborg began implanting transdermals using posts of his own design. While these procedures were largely successful, the designs left much room for improvement. It is Samppa’s philosophy that even if something works reasonably well, it is crucial to keep researching, reassessing, and redeveloping designs and procedures in order to push body modification innovation forward and always strive strive for better results.

Aneta and Samppa Von Cyborg
The very first implants that Samppa used were a simple rectangular base onto which a straight post was welded. The primary fault in this style was that no matter how carefully it was made and finished, there remained a welded seam which would not just rub against and irritate the skin, but act as a potential breeding ground for bacteria. To mitigate this, these days almost all transdermals are manufactured (usually by computer controlled tools) out of a single piece of metal.
The other problem with the first style was due not to the manufacturing process, but the actual design. Although the bases were drilled with two holes intended to allow tissue to grow through and anchor the jewelry, the holes were placed several millimetres from the post, leaving a large area of solid metal around the post itself. Since tissue can not adhere to smooth, solid metal, a gap was left through which bacteria could potentially enter the body, leaving the skin irritated — red, sore, and unattractive.
Samppa’s next step was to move to an oval design which attempted to address some of these problems.

Samppa’s oval transdermal implant design.
The first change was to add more holes in the base, four this time, to anchor this generation of implant more securely. Even though the holes were not identical, they were evenly balanced, resulting in more even growth of scar tissue. The placement of the holes closer to the post bonded the portion of the jewelry actually passing through the skin as snugly as possible, and meant that the pocket of tissue around the base of the post was much smaller and less susceptible to discharge building up inside it.
Over one hundred people had transdermals of this design implanted by Samppa, with great success rates, and these are also what Samppa currently wears in his own Metal Mohawk. Many companies manufacture their own variations and thousands of people have successfully healed transdermal implants of this design generation. Nonetheless Samppa felt there was still room for further improvement, and continued researching and seeking ways to improve healing and longevity and reduce inflammation and complications.

Various implant designs currently for sale by different vendors.
SAMPPA’S THIRD GENERATION TRANSDERMAL IMPLANTS
Many aspects of Samppa’s most recent transdermal implants are based on medical studies, and he emphasizes that the body modification movement needs to pay closer attention to medical research, development, and practises than it currently does. Unlike body modification artists who are rarely wealthy, a gargantuan amount of funding is allotted to medical research, and the testing undertaken is far more precise, thorough, and in-depth than the limited anecdotal results achievable by body modification artists. By paying attention to medical journals and other resources intended for surgeons, mod artists can take advantage of relevant knowledge and advances made by people who work on comparable procedures — albeit for very different reasons — but have much greater access to money and resources (and, perhaps distastefully, are able to occasionally dissect those who they have performed procedures on to examine the body’s response in otherwise impossible levels of detail).
The greatest influence on Samppa’s new transdermal implant design was a series of articles discussing amputees that had been fitted with an ITAP, or “Intraosseous Transcutaneous Amputation Prosthesis” (“intraosseous” meaning that it attached to the bone, and “transcutaneous” meaning it passed through the skin — the latter being the part that was relevant to Samppa’s work on transdermals). In short, an ITAP is a metal post that screws into the patient’s bone, then passes through the surface of the skin to the outside of the body, where a prosthetic can be firmly attached to it. ITAPs can range from small, attaching a prosthetic nose for example, or large, attaching a fake leg and capable of handling the full impact weight of the entire body. Ignoring the part of the ITAP that is screwed to the bone, and you have a device that is very similar to the transdermal implant of the body modification world, with many of the same qualities and issues. By studying advances in ITAP design, Samppa was able to extract crucial information in developing the most sophisticated transdermal implant to date.


Various ITAP implants created by the medical community.
From left to right: ITAPs used to hold a facial prosthesis in place, an ITAP in a finger, an ITAP in a femur used to mount a prosthetic leg, and a close-up of the ITAP used in an animal experiment.
Samppa’s reading revealed that the medical teams had been inspired by nature — specifically, by looking closely at the horns and antlers of animals. Like ITAPs (and transdermals), horns begin inside the body, pass through the skin, and protrude outside the body. However, animals do not suffer infections or irritation around their horns as can happen with humans with transcutaneous devices or jewelry. The researchers found that the two key factors were porosity — horns are full of many tiny holes into which a network of fine tissue fibres could grow into and root securely — and roughness — below the surface of the skin, the rough surface texture of the horn made it easier for tissue to adhere.
Samppa sought to apply these design features to his new transdermals, pictured below:

Every single element of the design was carefully considered, the result being a revolutionary new transdermal design which represents a significant step forward for the body modification industry. Some of the elements are as follow:
1. BASE FINISH
Much of the initial theories about transdermals were based on experience with body piercing. In body piercing, you want the jewelry to have a surface as smooth and highly polished as possible in order to move about and slide through the pierced hole without tugging — no adhesion of either the body or bacteria to its surface, which also makes it easier to clean. Without really thinking about it, at first most assumed that transdermals should have the same mirror finish, but the reality is that the last thing you want is for the base to move and slide around — you want to encourage adhesion rather than discourage it! Samppa therefore theorized that it made more sense to make the base rough, allowing tissues to get a better grip on it and anchor it in place more firmly. This is exactly like the subcutaneous part of an animal’s horn, and applies the same principle as used in the ITAP. Additionally, if you have ever seen a complete human tooth, you have probably noticed that the upper (exposed) part of it is smooth, which helps it stay clean, but the root is rough, in order to allow the gum tissues and skull to get a good grip on it and keep it held tight in your jaw.
The manufacturers of ITAPs experimented with making their implants rough by applying a textured layer of bioactive hydroxyapatite, a calcium mineral that makes up a significant percentage of bone and tooth. However, for the body modification world, this is difficult to achieve and prohibitively expensive, to say nothing of carrying with it some long-term risk of flaking off of the metal. Instead, Samppa chose to give the implant a rough textured finish using a technique similar to sandblasting.
2. BASE PERFORATION (HOLES)
The most visibly obvious change in Samppa’s new design is that instead of a small number of large holes, he uses a large number of small holes. The ITAP development team emulated horn by peppering their subcutaneous anchoring plates with multiple 0.7mm diameter holes. Due to a tooling constraint, Samppa uses a similar configuration but with 0.8mm holes — behind the scenes, this had to do with the difficulty in finding a manufacturer that had the complex machinery required to make these items, but was also willing to make them in small quantities at a reasonable price. Samppa is currently working with Barry Blanchard of Anatometal, one of the oldest and most experienced body jewelry manufacturers in the wold, to create the new transdermals.
These tiny holes allow tissue to grow through the plate and hold it firmly in place. Their even spacing encourages even tissue growth, resulting in implants which are held straight and true, unlikely to bend or wobble or shift if they are knocked or pushed — unlike transdermal implants of earlier generations. As with the second generation design, placing the holes as close as possible to the post creates a neat, closed “seal” around the post, preventing bacterial entry and subsequent infection. The smaller holes also result in the development of finer strands of anchoring scar tissue, which tend to lay flat rather than forming lumps or bumps which are visible as they bulge under the skin, as can be the case when bigger clumps of tissue grow through the larger holes in older implant designs. With these older transdermals it was not uncommon for the base to be visible as an obvious raised area of skin.
3. BASE THICKNESS
The base plate is only 0.6mm (22 gauge) thick, which is thick enough to be strong even when perforated with many holes, but is also thin enough to not create any visible raising of the skin.
4. POST FINISH
Unlike the base of the implant, the post, which travels through the skin and outside the body, is designed to be as smooth as possible, with a mirror finish. First of all, this allows it to be cleaned easily and thoroughly. Bacteria find it difficult to adhere to such a surface, making it more hygienic, as well as more visually appealing.
Secondly, the skin around the transdermal post constantly moves up and down due to the natural swelling and contraction of the skin. Swelling does not occur just after the implant procedure — the area should be expected to swell when the wearer gets hot, after exercise, if they drink alcohol or some drugs, if they are ill, or if the implant is struck and injured. Similarly, it will contract in the cold. Giving the post a smooth mirror finish allows the skin to slide up and down the post without aggravation, chafing, or adherence.
5. POST PROFILE
In addition to a mirror finish being essential to the movement of the surrounding tissue, so is ensuring that the post is straight, and of a consistent diameter along its length. Some artists have designed implants with flared posts, which have a smaller diameter close to the base and gets wider as they exit. Obviously this makes motion more difficult, and can even lead to tissue becoming trapped or squeezed, resulting in discomfort or even circulatory complications. Severe swelling could even put upward strain on the base of the implant, pulling it away from the body. Flared posts can also prove more difficult to clean, trapping dirt, debris, and bacteria. Posts of this flared design also require a larger hole to be made to implant them, meaning that part of their length will initially be surrounded by an open wound, which is highly undesirable. For these reasons, Samppa’s transdermals have a post of uniform diameter.
6. POST LENGTH
It is crucial that transdermal posts are long enough to comfortably allow for the natural swelling and contraction of the skin. If a post is too short, flesh could swell right over the top of it, or rub uncomfortably against the rim. Samppa’s design includes posts that are available in 4mm, 5mm, and 6mm in length, even though almost all of the other transdermals currently on the market have posts that are 5mm or less. Posts need to be appropriately sized for the thickness of the skin. Using posts that are too short are unlikely to allow for successful, comfortable healing, let alone an aesthetically pleasing result, and can force a shallower placement than is appropriate. Metal Mohawks usually require 6mm posts, with other parts of the body typically being more suited to 4mm or 5mm.
7. POST DIAMETER
At times, again extrapolating from body piercing knowledge, attempts have been made to produce “large gauge” transdermals — that is, transdermal implants with a thick diameter post. It is Samppa’s reasoning that this is a bad idea, because not only are they likely to be heavy and thus harder for the flesh to support, but they will create a larger channel for bacteria to enter the body — to say nothing of leaving a messy wound should they have to be removed. He strongly urges that if you want the “large gauge look” that you simply attach larger ends to the standard jewelry, which he manufactures with 4mm posts (6 gauge).
The reason Samppa settled on 4mm is that it is an ideal size that is both as small as possible, yet robust enough to stay in place and comfortably bear the weight of any attached jewelry. The reason smaller is better is that the smaller the post is, the smaller the potential channel for access to the inside of the body by bacteria is. History has shown that the average transdermal lasts between two and five years — after that they are removed either due to damage, scar tissue, migration, or simply the wearer tiring of them. Samppa’s Metal Mohawk is now eight years old, but it, along with some of his other older implants will be removed within days of this article’s publication, after which they will be replaced with his newer designs.
8. SINGLE-PIECE TITANIUM CONSTRUCTION
While almost all transdermals currently on the market are being made out of a single piece (to avoid seams which irritate tissue and harbour bacteria) using CNC equipment, some manufacturers are still using stainless steel. Stainless steel contains a tiny amount of nickel, which can leave a blue-coloured deposit in the skin over time, and is not as biocompatible as implant-grade titanium.

The evolution of Samppa’s transdermals, the third generation a fundamental paradigm shift.


A few of Samppa’s transdermal implant clients.
THE PLACEMENT OF TRANSDERMAL IMPLANTS
Not all problems that people have experienced with transdermals are due to design flaws — proper placement is also essential in ensuring good healing. The prevailing thinking among body modification artists has been that transdermal implants should be placed within the skin layers, as a piercing would be, but Samppa maintains (and he has used this placement from the very beginning) that the correct placement is for the base to rest completely underneath the skin. In the case of the scalp this means resting lightly against the bone of the skull — although it should be noted that the metal does not damage the bone because it there is still a layer of scar tissue between the bone and the metal, padding it — and in other areas it might mean resting lightly against the muscle. This allows for the implant to anchor properly.
One of the reasons that many artists place transdermals too shallow is due to a case in which a man with transdermal implants in his scalp suffered a life-threatening infection, resulting in erosion and loss of a significant portion of the bone in the area. At the time some maintained that this was due to the implant being placed too deep, but Samppa believes that in this case the infection was exasperated by improper implant design making it easier for bacteria to gain access to the body, coupled with inattention to the condition of the implant’s health.
Samppa has been using and monitoring his ITAP-inspired transdermal implants since July 2011, a number of them being done on clients with prior experience with his earlier implant designs. All have reported that the new implants heal faster, with less irritation and a lower incidence of infection. They are also much more securely anchored to the body, which is both a good thing and a bad thing. On one hand it means that they sit straight and true, are unlikely to reject, and can carry much more weight, but on the other hand, if they are struck, they will transfer much more force inward, unlike a transdermal or microdermal which sits only in the skin and thus is incapable of transferring significant force inward.
THINGS TO KNOW BEFORE GETTING TRANSDERMAL IMPLANTS
THE TRANSDERMAL IMPLANT HEALING PROCESS
(Using a Metal Mohawk to illustrate — other locations have their own similar but unique issues).
CARING FOR YOUR TRANSDERMALS LONG-TERM

An example of custom transdermal jewelry ends made by Samppa.
For more information, media requests, or to order jewelry or make an appointment to have transdermal implants done, please contact Samppa Von Cyborg c/o [email protected]
THIS DOCUMENT MAY BE REPRINTED IN FULL SO LONG AS IT IS NOT ALTERED AND NO INFORMATION IS CHANGED, ADDED, OR REMOVED.
* * *
Finally, as this article goes to print, Samppa Von Cyborg is setting out on a European Tour, offering not just transdermal implants, but magnetic implants and other implants (silicone skull implants, tiny ear implants, and more), tongue splitting, flesh stapling, ear pointing, repair of piercing scars and ear reconstruction, and all other forms of body modification — as well as educational seminars and blood painting! Again, get in touch via [email protected]
Samppa can also be found on Facebook at http://www.facebook.com/voncyborg
The current dates for the European tour are as follows:
London, UK == 11th – 15th July
Paris, France == 15th – 18th July
Gruyere/Lausanne, Switzerland == 18th – 24th July
Lyon, France == 24th – 25th July
Freiburg, Germany == 26th July – 1st August
Mannheim, Germany == 1st – 4th August
Krakow, Poland == 5th – 15th August
Berlin, Germany == 15th – 22nd August
Hamburg, Germany == 22nd – 23rd August
Copenhagen, Denmark == 24th – 29th August
Amsterdam, Netherlands == 29th August
Haarlem, Netherlands == 30th August – 1st September
Belgium == 1st – 2nd September (not confirmed yet)
Paris, France == 2nd – 8th September
London, UK == 8th – 13th September (not confirmed yet)
After Europe, the 2012 tour continues into Japan, Brazil, Argentina, Chile, and Puerto Rico, and then in 2013 heads into Australia and March.
Much of this tour is being done by car, so if you live between these cities, please get in touch because it’s easy to stop on the way, even if you live in a small town.

Blood Paintings by Samppa Von Cyborg. The painting on the left includes a self-portrait, and portraits of Lukas Zpira and Steve Haworth, two other pioneering body modification artists. The painting on the left is of Hunter S. Thompson.
Jymmi had Howie (LunaCobra) implant magnets into his earlobes. He won’t be able to use them for “clip on” jewelry like in this photo (the tissue would die from the pressure), but maybe he’ll be able to “hear” electromagnetism?

See more in “Discrete Implants“ (Implants) (members only)